Showing posts with label projects. Show all posts

Monday, March 28, 2011

The Reluctant DIY-er


A few weeks ago, I mentioned a little painting project I had taken on because I was loving the paint I found. I'm usually pretty reluctant to take on projects where I don't hire out a professional, because I think it's important for clients to get the best product they can when they work with a designer, but in this case, we decided to put in a little elbow-grease and I think it paid off.

When we found these sconces, it was hard to know what exactly the beads were made of -- we were hoping they were wood and were a pretty cream, but we knew that there was a chance that things are never as they seem. And, at the amazing price, there was room for a re-do and it would be worth it to either have the beads re-strung and swapped, or have them painted. Fast-forward a few weeks and the beads turn out to be shiny plastic and very yellow. Not so great against the new white paint and waincotting in my client's house.

We also decided that it was something that could maybe be done without the aid of a pro, so hence, my manicure of silver and bronze that lasted for far longer than I anticipated.

Here is a detail of how the paint looks -- it's a mix of bronze hammered base and a light coat of silver hammered paint. I wanted to make sure the white plastic beads were covered, but I was worried about having TOO much silver -- I didn't want it to look cheap or DIY and it HAD to look like it came that way. So hence the base of bronze and more blue tape than you can imagine in order to get every nook and cranny covered.

We also decided to wrap the plastic candle sleeves. My first thought was to use these awesome Kaarskoker sleeves, but sigh, they are out of the pattern I wanted. So we got creative with faux grasscloth in a dark silver.

Another detail

The finished and installed sconce. I'm pretty pleased.

Monday, January 17, 2011

Builder to Custom: Entry Project

Things have been crazy with a capital "C" ever since New Years -- I guess when it rains it pours. Everyone went dark during the holidays, but they are back and motivated. Not complaining, but I've been lacking on my blog posts because I'm just trying to keep my head above water.

One of the projects is transforming a builder spec house to a custom house with all new wainscoting, mouldings, open staircase, master bathroom, dining room and kitchen. This client wanted an old Seattle house look but with the convenience and community of living in the suburbs. It's been a fun project and it's and coming along nicely. I will post some before and afters as we get a little farther along.

But, here's a quick glimpse of the vibe we are going for in the entry: We are going for casual elegance that can withstand 3 young kids... Imagine dark hardwood floors, tall creamy white wainscoting and french doors, with pale blue, navy blue and a hint of aqua fabric. The fabric in my boards is in the living room, but somewhat visible from the entry (and blue not green as pictured). It's going to be gorgeous. I thought I'd share a few of the client's furniture options with you. Which one do you like?

Option One

Option Two

Option Three


Bench Fabric

Wednesday, October 21, 2009

Oh Happy Day


Construction has started on a project I've been working on since June. I'm so excited, as I'm sure the homeowner and contractor is also.
We are giving the inside of a 1970's home new life by adding new wood floors to the entry in place of the stick-on tiles (yes stick-on tiles courtesy of the previous owner), wainscoting, paint, a new powder room, new fireplace surrounds, and opening up the existing staircase to create a statement entry.

I'm so excited to see the progress. I'll keep you updated as the job progresses.
This calls for a glass of wine in celebration.
Hope you're having a good week.

Friday, July 17, 2009

60's & 80's - A beautiful combination

From our 1911 Craftsman we moved across the lake to the dreaded land of suburbia, the eastside. The place I told my husband that I would move "over my dead body" now became our home. We bought a 1960's daylight rambler that looked like it had been lifted straight out of a trailer park. Seriously.

What it did have was a view of Bellevue, Seattle and the Olympic mountains on a big lot. It was in a good neighborhood with a great school. But it also had shag carpet, an inside BBQ in the party room (aka downstairs playroom), a bathroom that had a pseudo stripper pole as a divider for the toilet and vanity, and every inch was covered in wallpaper from the 60's and the mauve and blue variety from the eighties. It was a huge cosmetic interior and exterior project.

We were feeling brave from our last project. This would be easy. It was cosmetic after all. So what if we now had a baby. We could still do everything ourselves. That was our crazy mindset as we moved into the new house. Needless to say, our son rocked our renovation world.

We tackled it room by room instead of the whole house and we brought in a contractor to do most of the work. We started with the downstairs party room as it was in it's original 60's glory and I was scared of what might be living in the carpet! I can see it now - a family gathered around the indoor grill roasting marshmellows. That carpet had to come out and fast!

Once the downstairs was livable (not finished but livable), we moved upstairs to tackle the outside and main living areas. Here are a few before pictures.

The outside during the renovation. You can glimpse the original mobile home.

The upstairs living room fireplace. This brick fireplace is over six feet long. Lovely wood paneling. Imagine this fireplace downstairs with another two openings on the left for the indoor grill and firewood storage below. How they didn't burn the house down I'll never know.


The updated eighties kitchen. Notice the orange formica countertops with the oak cabinets and bay window. The backsplash was harvest gold with leaves imprinted in the tile. You can't see the harvest yellow linoleum floor that tied into the backsplash. This is the danger of following trends.

An example of some of the wallpaper in the house. Every inch, and I mean every inch, was covered. It took me weeks just to remove it all.

Our friends thought we were crazy. How could we have given up our beautiful old home in the city for this? They didn't see the potential in this old rambler.

Now they think we're geniuses.

Thursday, July 9, 2009

Circa 1998 - 2002, Part 2

After an exhaustive four years of renovation, the "worst house I'd ever seen" was now quite livable. In fact, it caught the eye of the nice people at Better Homes and Gardens and was featured in their October, 2002 issue.

We chose to renovate and decorate in an eclectic cottage style as it worked with our minimal budget and the style of the house. I'm not one for houses decorated in literal period style, so no Craftsman furniture for us! We collected and reused materials before it was easy and fashionable. We spent many weekends sifting through junkyards and antique shops for hardware, lighting and furniture.

The outside of our first home. Wish we could have repainted it, but it wasn't in the budget. You can get a little glimpse of the steep stairs up to the house. It was a workout just to get to the front door!

The finished dining room. The antique chest has moved from room to room and house to house.

The other side of the dining room that leads into the kitchen.

The finished living room. Small but comfortable.

Our inexpensive but highly functional kitchen. We could only afford Ikea cabinets and they turned out to be a great value for the price. The wine rack was something we added when we miscalculated the space in the kitchen. It turned out to be a great feature for all those late night projects.

Our master bathroom. This original space was scary with a capital S. It was a small closet bedroom at best. We needed another bathroom in the house and this was the only space where we could add one.

Because it was a dormer, the ceiling height was limited. To visually open the space we fashioned a shower curtain rod out of wire and attached it to the built in storage unit. I loved this room as it was very functional yet warm and cozy.

The office space at the top of the stairs. If you remember from the before pictures, this is where the fireplace stood. We had to use every ounce of space in this house as there wasn't a lot of storage. The built in bookcases and file drawers became a life saver.

What you can't see is the hallway leading to our master bedroom and our actual master. To keep the small space visually open we didn't have any doors except for the bathroom. Once you came up the stairs it was one big long room. Again, because space was limited we had to be creative about closets and storage. We used the eaves of the attic for 4 custom height french door closets.

This was the sunporch out to the patio. We added all the beadboard, repaired the windows and added lighting. When we bought the house this was the scariest lime green room I'd ever seen. The paint was almost neon.

This house was an incredible project and learning experience. When I look back I'm not sure how we survived it!

I hope you enjoyed the pictures of our first home. Later I will show you the before and after pictures of our next renovation project.

Wednesday, July 8, 2009

Circa 1998 - 2002, Part 1

I grew up with a real estate mother who was always taking me through houses. I learned to appreciate a good house from a house that had potential from a house that no amount of money could fix. This was the 70's and raising a house and rebuilding wasn't part of our culture or vocabulary. My mother was and is, also a closet interior designer. Always moving furniture around, ripping out walls, repainting - you never knew what you'd find when you came home. She also had a passion for junking and collecting antiques before it was fashionable. She taught me to find a treasure on the side of the road or in a little crowded store. The thrill of the hunt was part of my DNA and my mother nurtured it.

My step-dad is an architect and once we blended families we needed a much larger house. As a result, I spent my high school years living in a house that he was building for us. After cramming 5 kids into a small rental for over a year, we bit the bullet and moved into the shell of the house. The kitchen wasn't finished and we had one bathtub as the only running water and sheets as divider walls. A wood stove heated the entire 5,000 square foot house. Needless to say we spent a lot of time in our ski clothes. We spent weekends shoveling gravel or dirt or whatever needed to be done. It was a family effort. It was glorious and fun. I learned a lot about houses and myself.

Fast forward to 1998. Seattle was in the middle of the real estate boom years. Houses had many bids over the asking price or weren't even coming on the market. Prices where climbing by the day.

My husband and I had been married a year. We wanted our first house and wanted to stay in the city. We happened to find a 1911 Craftsman house in Wallingford that had just come on the market and after I ran through it for 5 minutes, and we made an offer.

It was one of the worst houses I'd ever seen.

It had been a rental for over 20 years. Ceilings with water damage; A dead bird in the shag carpet of the scary torture attic (and I mean scary attic!); One bathroom where if you sat down on the toilet you're knees hit the bathtub; Pepto Bismol pink walls in the living room and original 1920's wallpaper in the dining room. The kitchen was so bad it wasn't even functional.

We were young and naive. We didn't understand the scope of the project we had just embarked on and it became our life. We were fortunate enough to have great friends who lived a street away that offered to let us move into their basement while we got the house to move in condition. Meaning, once again and not the last, working plumbing. We spent every hour outside of work rehabbing our house on a newlywed budget. It was sweat equity at it's best and this was prior to craigslist so it was harder to find treasures on a budget.

We moved into the main floor of the house, took the upstairs down to the studs and then closed the upstairs door until we had the time and money to tackle the giant project. It took us about 2 years to finally get to it.

Other than plumbing and electrical we did everything ourselves. Raising ceilings, removing a brick fireplace than ran through all three floors of the house, tiling kitchens and bathrooms, installing wainscoting and cabinets, creating a patio with the used bricks from the chimney, fixing leaded windows. You name it - we did it. We worked many nights after work until 1 am and did the same the next night. Did I mention that we didn't have a garage and it was 25 steep steps to the front door? 25 steps to haul all of our materials -- claw foot tubs, bricks! Good thing I was in my twenties.

By 2002 we had our first son and needed more space. The house was finished and we needed to move. We were addicting to renovations and we needed a new project.

Houses, remodeling and decorating is in my blood. Anything (well, almost anything when it comes to houses) is possible if you are willing to do the work or pay for it to be done. It can be very rewarding and fun.

I hope you enjoy the before and during photos.

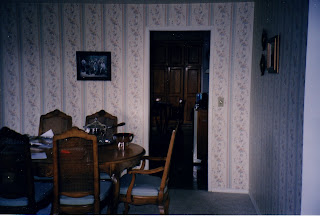
Living Room, Dining Room During. The pink walls are still visible but the original wallpaper had been stripped by this time.


Kitchen during the demo phase. The fireplace ran through this room so we had to take everything done to the studs and start over.

Me. This was a common sight during those years. My friends couldn't believe that I would get dirty and do this work myself. It was normal to stop by and see me with a tool belt and a nail gun putting up wainscoting or installing hexagon tile. Very glamorous.

Part of the original bathroom. You can see where the tub was. All floor joists had to be replaced. All in all, this room was gutted to the studs.


Bathroom during construction. I found an original claw foot tub and did the bathroom in the period style.

Upstairs on the day of demo.

Chimney that ran through the house. This is an upstairs view in the middle of demo. You can see the sagging walls and water damage. Pretty tile floor that was under the scary shag orange carpet. Dead bird is gone by now.

Once the walls were down. Chimney still has to go....

The upstairs once it was completely gutted. A blank canvas.

Check back for the "after" pictures.

Thursday, March 26, 2009

Update: French Chairs

As promised, here's the progress on my French armchairs.

I mentioned I had found caning under the upholstery, so my plan has changed and evolved as I've literally uncovered their potential (literally with about 10,000 nails and a right hand that can no longer grip anything due to the pliers).

I've found working with the unexpected makes for the best product in the end. Regardless of the pain and extra work it entailed. Today, I picked out french linen fabric for the seat. It's so beautiful - I can't stand it. I'll continue to update you at each milestone.

Tuesday, March 24, 2009

Project: French Chairs

Here's what I'm currently working on. I just found two very 80's french chairs (don't you love the pink satin bird-floral? no?) and am giving them a new life. In the process of stripping them yesterday, I discovered that they had the original cane back and seat. What a find! You never know what gem you are going to uncover. I will keep you posted on the progress.


Related Posts Plugin for WordPress, Blogger...